I just love doctoring up an old favorite! Especially when it's doctoring up bread and cheese, because let's face it. If you're starting with bread and cheese, you're already off to a good start. It can only get better from there!
This is super simple to make, and can be very versatile. I used a few slices of my homemade bread, white cheddar, artichokes in oil, and fresh spinach. Oh, and of course the butter to cook it in.
Mix up the cheese if you like, this would be great with fontina or gruyere. And if you had any aioli to smear on before grilling these bad boys up, that would be awesome as well.
I served this with black bean soup and pears. It was a simple soup and sandwich Sunday supper. Simply scrumptious, that is. =)
Other ways I love to fancy-up my grilled cheese: apples, tomatoes and pesto, butternut squash and sage, asparagus
Whole Wheat
I'm trying to be better about what's put into our bodies and this blog will document my endeavors to cook whole, local, organic, from scratch, with new ingredients... But with limited time, food allergies, a mostly vegetarian diet, and some "picky-ness," meal time just might prove to be a challenge.
Sunday, November 18, 2012
Monday, November 12, 2012
Come Back
Apparently I have been on hiatus.
Unintentional, but still, a hiatus.
I remember over the course of the last, what is it? 6 months, maybe?, that I thought to myself, "Well, I'll just let it go. There's no time." For writing a blog of course, not for cooking. There's always time for cooking.
The blog just didn't seem to be working for me. But way back in the spring when I first realized I had a much neglected blog, a fellow blogging friend said to me, "But you do it for yourself," and that stuck with me.
My blog writing has always been for me. A way to chronicle my kitchen endeavors and trials at new recipes. A way to hold myself accountable to whole foods.
However, just because it is homemade, doesn't mean it's healthy.
My downfall: Baking.
My downfall: Baking.
I love to bake.
I've always said, if I ever leave education, a bakery will soon follow. And there is so much more to bake than healthy whole grain breads. I am obsessed with perusing cake recipes, and frosting recipes, sweet roll recipes, and pie recipes...
I must remember to eat my vegetables.
But not today!
Today I have a hankering for cinnamon rolls and it was the perfect day for them. A lazy Sunday afternoon was the opportunity to indulge in my baking obsession (lazy only because I have a day off from work tomorrow and those pesky chores and case studies can be put off until then).
I had seen this clever guy on pinterest (of course):
But naturally it was written in a foreign language.
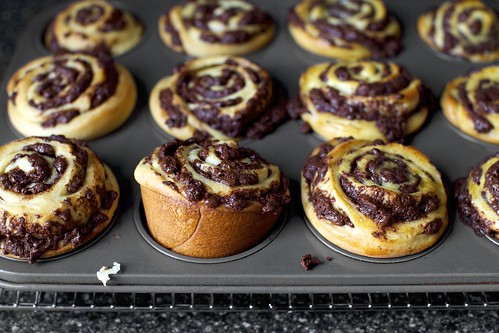
So I went to one of my favorite recipe sources (Smitten Kitchen always provides great inspiration) for a plain old cinnamon roll recipe and I stumbled upon this:
So I went to one of my favorite recipe sources (Smitten Kitchen always provides great inspiration) for a plain old cinnamon roll recipe and I stumbled upon this:
Chocolate swirl rolls on a Sunday afternoon! Yes please!
But then I realized I didn't have the chocolate chips Deb required.
So, improvisation was the next logical step.
I started with the basic cinnamon roll recipe:
1 cup of milk (the recipe called for whole, but I do not keep whole milk handy) with 3 tablespoons of butter heated in the micro to melt the butter.
Add that to your stand mixer with: 1 cup flour, 1/2 cup sugar, 1 egg, 2 1/4 t rapid rise yeast, and 1 t salt
Mix for about 3 minutes. Then with mixer speed on low, add in another 2 1/2 cups flour.
Once its all incorporated, trade out the paddle for the dough hook and let your mixer do its thing for about 8 minutes.
Then you need to oil up a bowl so that it coats your dough, cover it in plastic wrap, then a towel and allow to rise in a warm place for 2 hours. (For me, since its getting on to the cold time of year, my kitchen is rather cold. So my dough went into the bathroom with the door closed, its like a sauna in there!)
As my dough was having its two hour rise, I decided I'd try out my own filling:
Sugar, Cocoa, and Cinnamon.

When the rise was finished, I rolled out the dough, smeared it with butter, sprinkled on my concoction, and rolled it up:


Since I was already experimenting, I went back to Mr. Foreign Language's blog to have a look at his pictures (is he writing in portuguese, maybe? It's not French, Italian, or Spanish...):
So I cut my roll up the middle and immediately began to panic because the outter layers began to fall off. But I persevered any way (at least it would taste good, if it didn't look pretty).
I twisted the halves back together, and thought, "Hey, this just might work!"
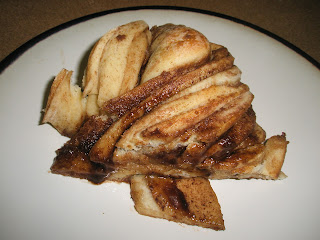
The next step was to pull the ends together to make it into a wreath shape, and voila! It was oven ready! Almost.
We still needed another 45 minute rising time (By the way, baking cinnamon rolls is really pretty easy, it just takes ALL afternoon).
Then it was oven ready!!!
30 minutes later:
It was time to dish up!
Now, what do two people and a ring of chocolate-cinnamon goodness do...
Oh, help!
Monday, July 9, 2012
Granola
Oh my have I been busy!
I thought summer was supposed to be a break.
I suppose I'm still disillusioned.
I've been cooking quite a bit, actually.
Here's the thing: not everything I make is blog worthy.
Shocking, I know. I'll give you a moment to recover...better now?
There are a few reasons for this fact.
1. Not everything I make works out. (Gasp!)
Take rice balls. Typing that, it doesn't even sound good. It tasted worse.
2. Not everything I make is all that original. (Double gasp!)
But say I try a recipe from someone else's site and I don't make it my own. Its already been done and it therefore not blog worthy. However, if someone else's recipe is a real coup for me, you'll hear about. Remember bagels?
3. I forgot to take pictures. (Oh #@$%!)
Darn it! This usually happens when I'm wrist deep in food and the hubs is not around.
On to lovely granola.
Remember how oatmeal is one of my favorite foods? Well, this recipe put it up on a pedestal.
I don't know why I ever bothered to buy granola at the store. Especially for $8 a pop!
The homemade stuff is so very, very, (very), tasty! My husband doesn't like store-bought granola, he'd rather just have cereal. Well, after making the first batch, I came home later to him devouring my newly made granola as a snack.
Bye, bye breakfast.
Kidding, this isn't really a problem. It's super easy to make.
However, I did hit a couple of hiccups in my recipe research. One of them being nuts.
I'm super-duper allergic. Can't touch the things with out breaking into a rash. Don't even get me started on the worst culprit of all-- PEANUT BUTTER!!! (I hate peanut night at bars).
EVERY granola recipe has nuts in it. Not a huge problem though, I just eliminated the culprit.
The other issue was the necessity of ingredients I don't ordinarily keep on hand (flaxseed, coconut flakes, dried cherries, etc.). It's not that these ingredients are hard to come by, I just don't keep them in my pantry. And I didn't want to make a homemade batch of granola that cost $12 because I had to buy ingredients.
Plus, I don't want the same thing every time. Granola, like oatmeal, is a blank slate for adding all types of nummy toppings (strawberries, bananas, dates, yogurt, chocolate & cherries, etc, etc...). Who wants to eat the same flavors everyday with all the possibilities that are out there?
Solution...I picked and chose what I liked from a variety of recipes and developed my own.
(Yay for originality in a common food!)
The result is basically a spiced and sugared baked oatmeal. Or Amy's Granola (I like the sound of that).
 |
| 5 cups old fashioned oatmeal or, one entire small canister. |
 |
| 2 t cinnamon, 1 t ground ginger, 1 t sea salt, 1/2 t nutmeg |
 |
| Add spices to oatmeal and mix together. |
 | |
In a saucepan, cook over medium heat:
1/2 cup olive oil, 1/4 cup honey, 1/2 brown sugar.
Here's a trick: measure out oil first, then use the same measuring cup to for the honey.
When you pour the honey out, it won't sick to the sides of the measuring cup!
I discovered this by accident and thought, "Nice..."
 |
| Stir it up... |
 |
| ...until smooth and combined. |
 |
| Pour over oatmeal mixture and stir to combine. |
 |
| Spread over baking sheet lined with parchment paper or silicone sheets. I needed to use 2 baking sheets. |
Bake at 300 for 45 minutes. Remove and allow to cool completely on baking sheet.
Then you can break apart the granola.
Place some in a bowl. Add milk and your own unique toppings.
Sunday, June 24, 2012
Quilting
It's been awhile since I've posted anything.
I haven't been cooking many new recipes.
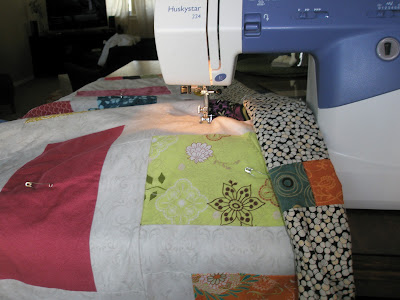
I've been quilting.
This fall we have 2 weddings + niece/nephew being born.
I've been sewing.
I have taken a few breaks for a patio sun shade, and some homemade granola, and some work (yay $!).
Stay tuned...
I haven't been cooking many new recipes.
I've been quilting.
This fall we have 2 weddings + niece/nephew being born.
I've been sewing.
I have taken a few breaks for a patio sun shade, and some homemade granola, and some work (yay $!).
Stay tuned...
Tuesday, June 12, 2012
Cookie Crisis
 |
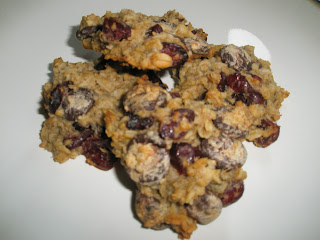
| My cookie baking atonement. Read on... |
Well people, it was one of those days.
I fell off the whole foods wagon and it was a disaster.
Flavor-wise, anyway.
I was having one of those crummy days that come around every once in a while.
I asked my husband if he wouldn't mind picking up some cookies on his way home from work. Pepperidge Farm sounded good, if not good for me.
Our local market did not carry Pepperidge Farms.
They had something else.
Chips Ahoy was it? or Nabisco?
Either way they're gone now and thank goodness!
They satisfied the crummy day craving, but a what cost?
I mean, the things didn't even absorb milk when I dunked 'em.
Not a good sign.
So I promised the hubs I'd make something tastier.
I didn't tell him my secret plan to make something healthier
(After all, I had to atone for my whole-food sins).
I discovered something.
If you want a truly healthy cookie, you must have applesauce on hand.
I didn't.
These have butter.
Sue me.
Here's the recipe. I didn't alter it.
One doesn't mess with baking chemistry.
 |
| 3 over-ripe mashed bananas |
 |
| My chosen add-ins: dried cranberries and dark chocolate chips. |
 |
| One of my favorite foods: OATMEAL! |
 |
| Looks like real cookie dough! |
Quote upon first taste, "Why do these taste fruity?"
(You can't pull anything past this guy!)
Alright, so they taste fruity! One of the main ingredients IS a fruit!
But aren't they good?!?!
Moist, chewy, and just the right amount of sweet? I thought they were perfect.
They have chocolate after all!
10 minutes later he came sniffing in the kitchen for the cookies
that don't have banana in them.
Doh!
I guess I'm back to the kitchen. For "real" cookie baking.
Try them for yourself. See what you think.
Let me know.
Saturday, June 9, 2012
Sweet Potato Tacos
These were killer!!! Everyone raved.
The recipe I chose to try out was for the crock-pot. However, I doubt I will ever make these in the crock-pot again. Because I use whole, dry beans, I had to run my crock pot twice: once for the beans and once for the potatoes. Then I had to mix everything back together again. Too much work! It actually took more time than was necessary and I had to do super planning to make this "weeknight" meal come together.
I also ramped up the recipe a bit. It seemed bit blah (no onions!)
 |
| Everything mixed together in the crock-pot. |
(serves 4)
1/2 cups cooked black beans
2 large sweet potatoes
1/4 c stock (I use veggie)
2 T lime juice
1 t cumin*
1/2 t coriander*
2 t garlic, minced*
1 small onion, diced
olive oil
Toppings:
shredded cheese (I used Monterrey Jack)
lime wedges (for squeezing, serve some Coronas while you're at it ;-)
fresh cilantro
*this is what the original recipe called for, I used more. I like spice. Maybe you don't, so I listed the original amounts.
Putting it together:
Dice the sweet potatoes into 1-inch cubes and place in a baking dish. Toss with olive oil, lime juice, stock, cumin, coriander and garlic. Bake at 400 until very tender (20-30 minutes).
Cook diced onions in a bit of olive oil until transparent.
When everything is cooked, mix potatoes, onions and black beans together in a large bowl.
Serve with tortillas, cheese, cilantro and lime wedges.
I also made rice and corn as sides.
Some of us went a la carte with the sides, some of us (me) put everything on the tortillas (could you tell from the picture?)
Monday, June 4, 2012
BBQ'd Asparagus Pizza
I'd been hearing about the seasonal pizza available at a local restaurant,
so I went and tried asparagus pizza.
Delish!
(This is technically a copy cat recipe, though I think the grilling aspect makes it way better!)
Confession:
Asparagus is one of my top 10 favorite foods.
It just came into season and I can't seem to get enough of it.
Unfortunately, I love it so much that my husband is already tired of it.
Any of you out there who eat seasonally have this experience?
One family member eats as much as she can while the gettin' is good
while others tire of that particular vegetable/fruit long before its growing season is over?
Just us?
Moving on: Pizza takes only minutes to cook on the grill and
I wanted to make sure the toppings got cooked as well.
So, I cut my asparagus spears thin, lengthwise.

Traditional tomato sauce didn't seem like a good choice for my toppings.
I couldn't remember how the restaurant "sauced" their pizza, so I improvised.
Here's several tablespoons of olive oil being infused with rosemary and pressed garlic.
This whole mixture went onto my pizza crust.
I made one recipe of pizza dough the night before in anticipation of this grilling event.
I divided the dough in half and we rounded them into pies as best we could.
I say "we" because my husband, the non-cook, is actually fantastic at shaping pizza crusts.
Unfortunately, my transferring the pie to the grill spoils his craftsmanship. Boo!
I made one of these pies into a traditional cheese pizza, since he's tired of my fave veggie.
Here's the pie on the grill:
 |
| I drizzled the underside with a bit of olive oil to prevent the dough from sticking to the grill. |
It works bests to cook one side of the crust, take it off the grill, flip it over and dress the grilled side:
The garlic/rosemary/olive oil "sauce" is under the asparagus spears.
See it glistening?
Topped with shredded Parmesan and mozzarella:
Then you place the whole pizza back on the grill:
This will grill the underside of the crust and get the cheese all melt-y.
That's a technical term, by the way: Melt-y.
I actually forgot to put olive oil on the underside this go-around.
But
there was no sticking. So maybe it was unnecessary the first time?
Who
knows?
 |
By the way, it works better if you close your grill.
I just can't take pics with the grill closed. Ha!
OMGraciousness! Doesn't that look like heaven?
Yep, heaven will be filled with asparagus
(and cheese and wine and chocolate and ice cream and...)
It's only been a couple of days since I made this.
Would it be wrong to make it again?
If you need me, I'll be in my kitchen.
... kneading pizza dough.
Subscribe to:
Posts (Atom)


