Tuesday, January 31, 2012

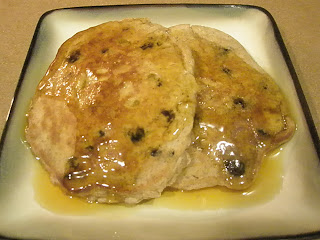
Oatmeal Cookie Pancakes

Here's a simple, delicious, and wholesome adaptation of a classic breakfast food.
It is so like an oatmeal cookie, you'll feel like you're starting with dessert!

Begin with your traditional pancake batter, all mixed together.

To a double batch I added a cup of raisins and a cup of oatmeal.

Mix into batter. 
Adding a little extra milk to allow for some absorption by the oats.

Also, toss a cap-full of cinnamon into the mix.


Cook away on the griddle.


And in no time you'll have pancakes that remind you of my favorite cookie!


A note on "brinner." I rarely make breakfast food in the morning. I don't have time for it during the week, so we do fine with oatmeal, granola, cereal, yogurt, and assorted other quick starters for the day. On weekends, when I have time, I like to sleep in late and as a consequence, I wake up starving...we eat out for brunch regularly on weekends. Thus, brinner was born: breakfoods at dinner time. I have the time in the evenings to make my beloved, comfort-food meals.

Tuesday, January 24, 2012

Pasta with Yams & Leeks

This dish is a go-to, busy weeknight meal for me. 
It cooks up well with just about any pasta, and I almost always have yams on hand. 
I have made this with penne, fettuccine, farfalle, tortellini, and in this instance, ravioli. 

Unfortunately, a quick week night meal does not include homemade pasta. 
I rarely have the foresight to plan that far ahead on my weekends. 
This time the pasta is store-bought.

 I started by slicing up 2 medium sized yams and few (2-3 depending on size) leeks. 

 I tossed the vegetables with 3-4 minced garlic cloves and 
sauteed them in a skillet with oil and butter. 

Here's a trick for deeper flavor in this dish: 
before tossing the vegetables together, dust the yams with a bit of nutmeg.

 While the veggies are cooking, get your pasta going.

 When everything is done, drain the pasta and add it to the skillet with the yams and leeks. 
Give everything a good toss, coating the pasta with the remaining oil and butter. 
Let the pasta have a chance to cook for just a few minutes in the pan. 
This adds to the flavor as well.

The pasta is now ready to be served. 
With a healthy dose of Parmesan cheese, of course. 

Tuesday, January 17, 2012

Lean Times and (not) Enchiladas

Well, January has rolled around again and after the holidays, we're all feeling a little pinched. In the waistband and in the pocketbook. Am I right?

I literally revert to the most basic of meal ingredients during these times: rice and beans. I make a big batch on Monday and make it stretch as long as I can (though there's lots of "belly-aching" by the end. Ha! Another double entendre!).

The trouble comes along with how to make these simple ingredients have some variety.

I had a hankering for enchiladas the other night, but not the ingredients to make the real thing. It was a rice & beans week, after all. But I thought I'd experiment a bit, and it turned out quite well. My husband even commented after his first taste (He generally thinks my cooking is good and therefore only comments when I pry, or if it stands out).

So here you are, from my kitchen to yours:

Not Enchiladas

This made enough for my husband and I to have dinner and a "Left-Over's Lunch" 
(always my goal).

I started with pre-cooked rice and black beans. 
(I made a Crock Pot of beans on Monday and make the rice as I need it.)

The most important ingredient in any cooking experiment!


 I started by dicing half an onion, mincing 4 garlic cloves, and shredding a carrot.

Then I threw it all in a hot skillet with some olive oil until 
everything was soft and the onions were transparent.

I also added a dash of cayenne pepper and a cap-full each of cumin and chili powder.

 I mixed the cooked veggies with rice and black beans. 

 Then I wiped my pan clean and added a touch of oil.

I like to soften my corn tortillas by cooking them it a bit of oil.
This helps them to be more pliable as I form the enchiladas.

 Doesn't that look ready to eat now! 
(It's even better when you know its easy on the wallet and the skinny jeans)

But we're not done yet:

 Fill your baking dish...

Top with cheese...

And bake at 350 for 15ish minutes
(until the cheese is melted and bubbly).

While eating these, we decided they would be especially ooey-gooey good 
with cheese on the inside as well as on the outside. 

But since this is a post about being "lean," I didn't go there. 

Maybe in February when we've forgotten all about those pesky skinny jeans again.


 With hot sauce!

Tuesday, January 10, 2012

Homemade Pasta: A Labor of Love

For awhile now, I have been harboring a desire to make homemade pasta. Not just any homemade pasta, but ravioli. At first, I was intimidated by finding the ingredients I would need: 0% flour, semolina flour...but a recent inquiry at a local Italian restaurant set my mind at ease. Their chef uses all-purpose flour! 

I then set out to begin my endeavor. Internet research led me to a super simple pasta recipe thanks to The Pioneer Woman and a video of some guy's granny. My impression was that the dough would take tons of kneading and rolling, so I recruited. With family in town for the holidays, it wasn't difficult to find helpers--my mom and brother were more than willing. 

I headed to Mom's (and her bigger kitchen) with my mind a buzz with ideas for kneading, rolling, sealing, and cutting. Turns out, all my strategizing was for naught. Not only did my mother have a pasta maker, but a ravioli maker as well! Things were looking pretty good and actually it turned out be rather simple--but time* consuming. 

Here's how it went down.

"Rule of Thumb"
(according to The Pioneer Woman)
2 eggs per cup of flour
1 egg per person
So, 2 eggs and 1 cup of flour serves 2 people.

We were making ravioli for 6, so I wanted to make sure I had plenty.
I used 7 eggs and 3 1/2 cups of flour.
This was done in 2 initial batches of 4 eggs/2 cups and 3 eggs/1 1/2 cups.

Start by making a well in your flour and cracking the eggs into the well.
Using your hands, loosly mix the eggs and flour together.

I did this in a bowl and then turned the dough out onto the floured counter:
(The video of granny shows her doing everything on the countertop.)
 

Then begin kneading the dough until it is very smooth and elastic.
It took about 10-15 minutes of kneading:

Kneading:

Kneading some more:

Done!

Cover with a dish towl:

And a bowl:
(this keeps it from drying out)

Allow dough to rest for a minimum of 20 minutes.
Divide dough into manageable size for rolling:

Run each dough ball through the pasta maker, or roll out using a rolling pin. 
I started on setting 1 and moved up to setting 5.
The dough was folded and patted with flour between each run:

Each setting needs to make the dough smooth and even. 
This took several runs at each number. 
My brother taking a turn:

Cut the dough to fit the ravioli maker. 
This process took quite a while, 
so the dough strips were covered with a damp tea towel to prevent drying:

Next, the filling.
 My husband's uncle had caught and smoked his own Sturgeon and 
we were lucky enough to have him share a fillet with us. 
Ricotta and and egg would provide the rest of the filling:

Here it is combined:

The ravioli maker and filling, all ready to go:

Cranking out ravioli:

Separated and ready to be cooked:

We boiled the ravioli's for about 5 minutes and dressed them with olive oil, mixed dried herbs (from the summer's garden), and seasoned with salt and pepper to taste:

Some salad and steamed veggies to go with and dinner is served!

My initial plan (before I knew I'd have a pasta maker) was to show everyone the video of granny and follow her lead. Since then, I stumbled on Annie's Eats Homemade Pasta Tutorial and may follow her advice the next time around (who knows if I'll have mom's kitchen to raid).

The advantage of cooking with helpers: there's someone to take pictures of the action! Thanks Jenny Jo!

*A note on time frame: We began the pasta making at about 1:30, let the dough rise for about an hour and a half, and ate dinner around 6:30. This is an all day process, good for a rainy day or quality time together in the kitchen.

Tuesday, January 3, 2012

Egg-Bread Scramble

Several months ago, my husband and I visited his brother in Bellevue, WA and we had a yummy brunch. I have been dreaming of the scramble I ordered ever since our visit and I decided I'd try to recreate it. My version was just as good as I remembered--Bonus!!!

This is a great way to use up the remains of a bread loaf.

1/3 of a left-over french loaf cut into cubes
4 whole eggs and 4 egg whites
 The only reason I used egg whites is because I had them left over in my fridge. Use all whole eggs or all whites. The amount of egg really depends on how much bread you are using and how many people you are feeding. My combination works well for 4 people.

Whip the eggs with some milk, like you're making scrambled eggs.
(Or use cream if you're being indulgent--remember, everything tastes better with extra fat, and I will always have 10 extra pounds to keep me soft! Ha!)

 You will need 1/2 cup diced mozzarella cheese and 4 diced scallions. 

Toast bread cubes in skillet over medium-high heat with some butter and olive oil. 

Trivia:
Did you know combining butter with oil helps to keep the butter from browning/burning?

 Pour eggs over bread and turn continuously with spatula. 
 When eggs are half-way cooked, stir in mozzarella cubes.

Finish cooking by popping frying pan into a 350-degree oven for 10-15 minutes.


Top with scallions, season with salt & pepper to taste, and serve!