Showing posts with label Sweet Treats. Show all posts

Monday, November 12, 2012

Come Back


Apparently I have been on hiatus. 

Unintentional, but still, a hiatus.  

I remember over the course of the last, what is it? 6 months, maybe?, that I thought to myself, "Well, I'll just let it go. There's no time." For writing a blog of course, not for cooking. There's always time for cooking. 

The blog just didn't seem to be working for me. But way back in the spring when I first realized I had a much neglected blog, a fellow blogging friend said to me, "But you do it for yourself," and that stuck with me. 

My blog writing has always been for me. A way to chronicle my kitchen endeavors and trials at new recipes. A way to hold myself accountable to whole foods.

However, just because it is homemade, doesn't mean it's healthy.
My downfall: Baking. 
 
I love to bake.
I've always said, if I ever leave education, a bakery will soon follow. And there is so much more to bake than healthy whole grain breads. I am obsessed with perusing cake recipes, and frosting recipes, sweet roll recipes, and pie recipes... 

I must remember to eat my vegetables. 
But not today! 

Today I have a hankering for cinnamon rolls and it was the perfect day for them. A lazy Sunday afternoon was the opportunity to indulge in my baking obsession (lazy only because I have a day off from work tomorrow and those pesky chores and case studies can be put off until then). 

I had seen this clever guy on pinterest (of course):
image linked to website

But naturally it was written in a foreign language.

So I went to one of my favorite recipe sources (Smitten Kitchen always provides great inspiration) for a plain old cinnamon roll recipe and I stumbled upon this:

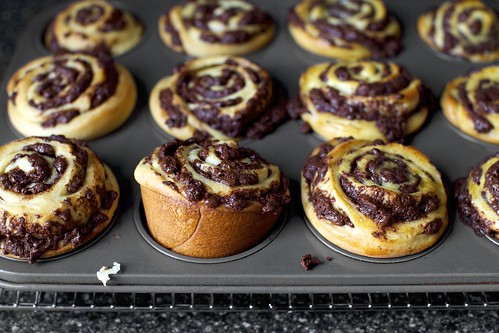
chocolate swirl buns
image linked to Smitten Kitchen's recipe
Chocolate swirl rolls on a Sunday afternoon! Yes please! 
But then I realized I didn't have the chocolate chips Deb required. 

So, improvisation was the next logical step. 

I started with the basic cinnamon roll recipe:


1 cup of milk (the recipe called for whole, but I do not keep whole milk handy) with 3 tablespoons of butter heated in the micro to melt the butter.
Add that to your stand mixer with: 1 cup flour, 1/2 cup sugar, 1 egg, 2 1/4 t rapid rise yeast, and 1 t salt
Mix for about 3 minutes. Then with mixer speed on low, add in another 2 1/2 cups flour. 
Once its all incorporated, trade out the paddle for the dough hook and let your mixer do its thing for about 8 minutes.
Then you need to oil up a bowl so that it coats your dough, cover it in plastic wrap, then a towel and allow to rise in a warm place for 2 hours. (For me, since its getting on to the cold time of year, my kitchen is rather cold. So my dough went into the bathroom with the door closed, its like a sauna in there!)


As my dough was having its two hour rise, I decided I'd try out my own filling:
Sugar, Cocoa, and Cinnamon.

 
In the bowl went: 3/4 cup sugar, 1 t cinnamon and 4 heaping teaspoons of cocoa. I thought 3 tsp of cocoa was fine, but I had the hubs try the mixture and he voted for the 4th tsp.

When the rise was finished, I rolled out the dough, smeared it with butter, sprinkled on my concoction, and rolled it up:


Since I was already experimenting, I went back to Mr. Foreign Language's blog to have a look at his pictures (is he writing in portuguese, maybe? It's not French, Italian, or Spanish...):

So I cut my roll up the middle and immediately began to panic because the outter layers began to fall off. But I persevered any way (at least it would taste good, if it didn't look pretty).


I twisted the halves back together, and thought, "Hey, this just might work!"


The next step was to pull the ends together to make it into a wreath shape, and voila! It was oven ready! Almost.

We still needed another 45 minute rising time (By the way, baking cinnamon rolls is really pretty easy, it just takes ALL afternoon).

Then it was oven ready!!!


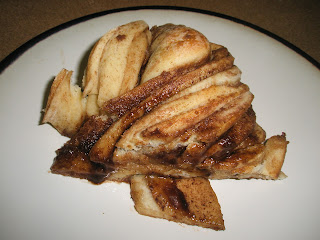
30 minutes later:


It was time to dish up!


Now, what do two people and a ring of chocolate-cinnamon goodness do...

Oh,  help!


Monday, July 9, 2012

Granola

Oh my have I been busy! 
I thought summer was supposed to be a break.
I suppose I'm still disillusioned. 

I've been cooking quite a bit, actually.
Here's the thing: not everything I make is blog worthy. 

Shocking, I know. I'll give you a moment to recover...better now?
There are a few reasons for this fact.

1. Not everything I make works out. (Gasp!)
Take rice balls. Typing that, it doesn't even sound good. It tasted worse.

2. Not everything I make is all that original. (Double gasp!)
But say I try a recipe from someone else's site and I don't make it my own. Its already been done and it therefore not blog worthy. However, if someone else's recipe is a real coup for me, you'll hear about. Remember bagels?

3. I forgot to take pictures. (Oh #@$%!)
Darn it! This usually happens when I'm wrist deep in food and the hubs is not around. 

On to lovely granola. 
Remember how oatmeal is one of my favorite foods? Well, this recipe put it up on a pedestal.

I don't know why I ever bothered to buy granola at the store. Especially for $8 a pop!
The homemade stuff is so very, very, (very), tasty! My husband doesn't like store-bought granola, he'd rather just have cereal. Well, after making the first batch, I came home later to him devouring my newly made granola as a snack. 
Bye, bye breakfast. 

Kidding, this isn't really a problem. It's super easy to make.

However, I did hit a couple of hiccups in my recipe research. One of them being nuts.
I'm super-duper allergic. Can't touch the things with out breaking into a rash. Don't even get me started on the worst culprit of all-- PEANUT BUTTER!!! (I hate peanut night at bars).

EVERY granola recipe has nuts in it. Not a huge problem though, I just eliminated the culprit. 

The other issue was the necessity of ingredients I don't ordinarily keep on hand (flaxseed, coconut flakes, dried cherries, etc.). It's not that these ingredients are hard to come by, I just don't keep them in my pantry. And I didn't want to make a homemade batch of granola that cost $12 because I had to buy ingredients. 

Plus, I don't want the same thing every time. Granola, like oatmeal, is a blank slate for adding all types of nummy toppings (strawberries, bananas, dates, yogurt, chocolate & cherries, etc, etc...). Who wants to eat the same flavors everyday with all the possibilities that are out there?

Solution...I picked and chose what I liked from a variety of recipes and developed my own. 
(Yay for originality in a common food!)

The result is basically a spiced and sugared baked oatmeal. Or Amy's Granola (I like the sound of that).

5 cups old fashioned oatmeal or, one entire small canister.


2 t cinnamon, 1 t ground ginger, 1 t sea salt, 1/2 t nutmeg

Add spices to oatmeal and mix together.


In a saucepan, cook over medium heat: 
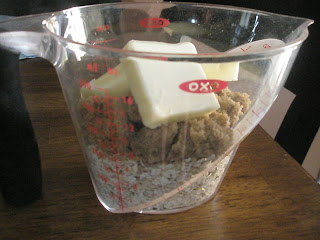
1/2 cup olive oil, 1/4 cup honey, 1/2 brown sugar.
Here's a trick: measure out oil first, then use the same measuring cup to for the honey. 
When you pour the honey out, it won't sick to the sides of the measuring cup!
I discovered this by accident and thought, "Nice..."

Stir it up...

...until smooth and combined.

Pour over oatmeal mixture and stir to combine.

Spread over baking sheet lined with parchment paper or silicone sheets. I needed to use 2 baking sheets.
Bake at 300 for 45 minutes. Remove and allow to cool completely on baking sheet. 
Then you can break apart the granola. 
Place some in a bowl. Add milk and your own unique toppings. 

Saturday, March 17, 2012

Pin-spiration

I found this fun little "apple pie" on Pinterest. 


But the recipe was in an indiscernable (to me) Asian language. 
So I took the Pin-spiration, and tried it out. 

 I diced up 3 apples and tossed them with cinnamon and sugar:


 I rolled out my favorite pie crust recipe and placed the apples in the center:


 I cut flaps into the crust:


 And then alternated folding the flaps across the apples at an angle. 


Then I popped it into the oven at 350 for 35-45 minutes 
(my crust recipe calls for 35 minutes, but I always have to go longer for a golden crust).


Here's my pie crust recipe, if you need one.

Pulse these ingredients in a food processor to combine:
1 1/2 c flour
1/2 cup powdered sugar
1 stick of butter, cut into pieces

Then add 1/4 cup lemon juice and, again, pulse to combine.

Ball up dough and cover with plastic wrap. Chill in fridge for 10 minutes. Then it's ready for use.


Wednesday, December 28, 2011

Orange Cake

Well, I still have copious amounts of Orange Simple Syrup in my fridge and am attempting to use it up. The decadently written book Under the Tuscan Sun, by Frances Mayes is scattered with chapters of Tuscan recipes (one major reason I love travel/food books). Mayes just happened to include a recipe for lemon cake and as I read, my mind said, "Ah Ha! Use orange instead of lemon!" So I did and the result was better than I could have imagined. The cake is still super moist after several days and the orange flavor is so crisp and indulgent all at once.

In honor of Mayes, here is her lemon cake recipe with my adaptations to follow:

"Cream together 1 cup of sweet butter and 2 cups of sugar. Beat in 3 eggs, one at a time. The mixture should be light. Mix together 3 cups of flour, 1 teaspoon of baking powder, 1/4 teaspoon of salt, and incorporate this with the butter mixture alternately with 1 cup buttermilk. (In Italy, I use one cup of cream since buttermilk is not available.) Begin and end with the flour mixture. Add 3 tablespoons of lemon juice and the grated zest of the lemon. Bake in a nonstick tube pan at 300 for 50 minutes. Test for doneness with a toothpick..." 

Mayes, F. (1996). Under the Tuscan Sun. New York: Broadway Books, 238-239.


 Creaming together sugar and butter:

Add 3 eggs, 1 at a time.
I also used cream (instead of buttermilk), since I had it on hand. 


I substituted the zest of an orange and 3 T orange syrup. 
I used most (3/4) of the zest in the cake, reserving some (1/4) for the icing. 

I greased and floured my nonstick pan, just to be on the safe side. 


The icing on the cake!

To make icing:

Whip the following ingredients together in a bowl with a whisk and pour icing over cake.*

3 c powdered sugar
1/2 c cream
reserved orange zest from cake recipe
3 T orange syrup
3 T  softened butter

*This makes more than enough...use the extra on some left-over Christmas sugar cookies


Thursday, December 22, 2011

Tiny Treats

 Miniature Pumpkin Pies and Orange Chocolate Truffles
Need I say more???


These tiny pies are so cute and will look smashing with a dollop of 
Bourbon-Maple Whipped Cream on top. 

The chocolate truffles were simple to make and I used the orange-infused simple syrup that resulted from my candied orange peels.
 Some I covered in cocoa powder, others with powdered sugar.

 They make a perfect gift wrapped up in parchment paper!


 Now for the recipes:

Pie filling:
The Bourbon-Maple Whipped cream recipe is there as well, but I at least double what is called for regarding maple syrup and bourbon.  

Pie crust:
1/2 cup shortening
1 cup flour
2 tablespoons water
  • Cut together with a hand-held pastry blender and roll out on a floured counter top. Cut circles to the size of your muffin tin. 
  • Butter and flour muffin pan. Place pie crust circles into muffin pan and fill almost to the top with pie filling. Bake at 425 for about 30 minutes. Watch carefully as these small pies may cook up more quickly than you expect. Test with a toothpick for done-ness.

Orange Chocolate Truffles
Adapted from Cook's Illustrated Jan/Feb 2012 edition

  • melt 1 bag dark chocolate chips (I use Ghirardelli's chips) in microwave
  • mix 3 T orange simple syrup and a pinch of salt into 1/2 cup heavy cream
  • barely warm cream mixture in mircowave
  • pour cream mixture over melted chocolate and stir together. 
  • Pour into a parchment paper lined baking dish.Cover and set on counter to cool for 2 hours, then place in refrigerator to chill for another 2 hours.
  • Remove, cut into 1-inch squares, rolls squares into balls and cover in cocoa powder, confectioners' sugar, walnuts, sprinkles...


Saturday, December 17, 2011

Candied Orange Peels


Thanks go out to my brother for inspiring and guiding this recipe! 
This is such a tasty treat and as simple as boiling water. 
Take them to your next holiday shindig for a real crowd pleaser.


Start by peeling your oranges. I used 4 and worked in 2 batches.
Removing the pith will reduce bitterness, but that is a personal preference. 


Fill sauce pan half-way full of water and bring to a boil. 
Add peels and boil for 5 minutes.
Drain water and repeat boiling process.

Drain water and refill sauce pan with water one more time. 
This time use 2 cups of water and and 1 1/2 cups sugar and (optional) 1 T ginger.
Boil peels for another 5 minutes.

Drain once again.


Look at that sugary goodness!
Who knew making candy was as easy as boiling water?!?!

Tip: 
Place a large bowl under the colander to catch the "Orange Infused Simple Syrup" 
that you have inadvertently made during this last boiling process.

My will be used in Chocolate Truffles.
Stay tuned...

The cherry on top:
Dip candied orange peels in chocolate.

Then, dip the orange sections in chocolate.


If I were better at picture taking. This last photo would look delicious. I just couldn't get them to not look like slugs. My husband is kinder: he says they look like peppers in this pic.


Monday, August 1, 2011

Peach Cobbler

I had a craving this weekend and I totally took care of it! And no, I'm not referring to the addictive fro-yo that has taken this town by storm (I swear, it's laced with something). I'm talking about good ol' home baked peach cobbler here.


Peach cobbler recipe:

3-4 sliced peaches tossed with 3-4 tablespoons of brown sugar
(enough to generously cover your baking dish & compensate for "quality control" tastings)

top with:
2/3 cup oatmeal
1/3 cup brown sugar
3-4 tablespoons cold butter 
(your call on how "lite" this turns out, I tend to side with Paula Deen when it comes to butter)


Now, get your hands in there and combine those ingredients to incorporate the butter. 
Then spread evenly over the peaches. 
Bake at 350 for about 10-15 minutes.


Scoop out a generous helping...
and serve with whipped cream.
(or if you're ravenous like me, just pour the heavy cream un-whipped over the top--
it'll taste the same.)